Shared Element in Navigation
19 Feb, 2021
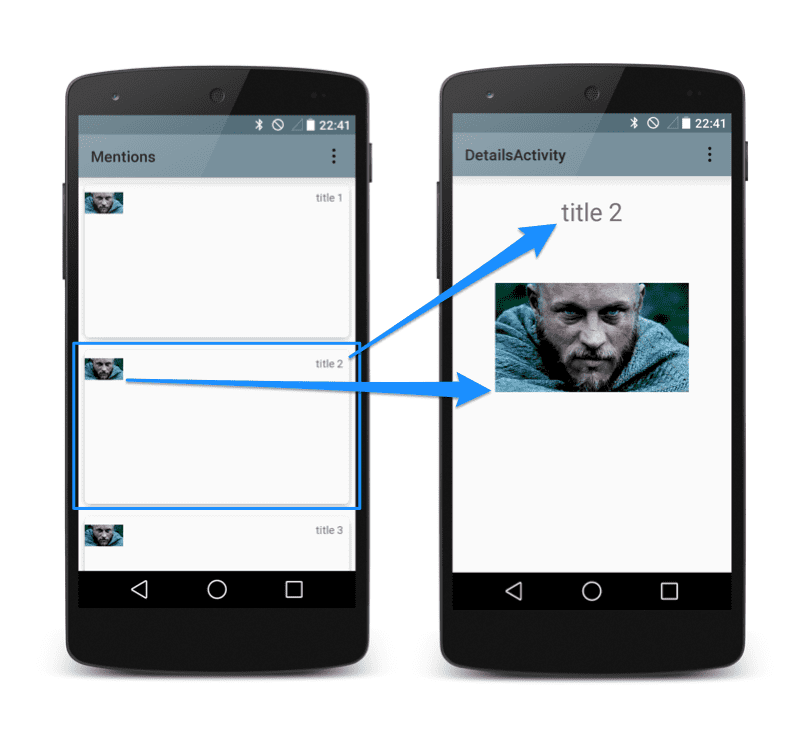
안드로이드 JetPack Navigation을 사용 중일 때 프래그먼트 간에 위와 같이 요소(이미지)를 공유하려면 어떻게 해야 할까요? 안드로이드 공식문서에 이렇게 나와있습니다. FragmentNavigator.Extras클래스를 사용하면FragmentTransaction.addSharedElement()를 사용하는 것과 유사하게 공유 요소를 전환 이름으로 한 대상에서 다음 대상으로 매핑할 수 있습니다. 그런 다음 아래 예와 같이 추가 항목을navigate()에 전달하면 됩니다.
FragmentNavigatiorExtras
@Suppress("FunctionName")
fun FragmentNavigatorExtras(vararg sharedElements: Pair<View, String>) =
        FragmentNavigator.Extras.Builder().apply {
            sharedElements.forEach { (view, name) ->
                addSharedElement(view, name)
            }
}.build() FragmentNavigatiorExtras의 내부를 보게 되면 sharedElements가 내장되어 있군요. 그래서 view와 string 값을 쌍으로 공유해주는 방식입니다. SharedElement를 잠깐 정리하고 가자면,
- Activity->Activity 간 화면 전환에 사용가능.
- Fragment->Fragment 간 다른 방법으로 사용 가능.
-
Activity -> Activity +Fragment 구조에서는 사용 불가능. sharedElements에는 유니크한 transitionName이 필요하기 때문에 우선 xml의 공유할 view에 transitionName을 설정해줍시다.
First Fragment
<ImageView android:id="@+id/imgSkin" android:layout_width="match_parent" android:layout_height="match_parent" android:adjustViewBounds="true" android:scaleType="centerInside" android:transitionName="@string/transition_name" tools:ignore="ContentDescription" /> 물론 다음 프래그먼트에서도 뷰를 공유해야 하기 때문에 같은 이름의 transitionName이 필요하겠죠?
Second Fragment
<ImageView android:id="@+id/ivMainSkin" android:layout_width="100dp" android:layout_height="100dp" android:layout_marginStart="20dp" android:layout_marginTop="20dp" android:padding="20dp" android:transitionName="@string/transition_name" app:layout_constraintStart_toStartOf="parent" app:layout_constraintTop_toTopOf="parent" tools:ignore="ContentDescription" tools:src="@drawable/md_item_selected" /> 이제 사용 방법을 보겠습니다.
First Fragment
val extras = FragmentNavigatorExtras( imageView to getString(R.string.transition_name) ) val action = SkinFragmentDirections.actionSkinFragmentToDetailFragment(skinType) NavHostFragment.findNavController(this@SkinFragment).navigate(action, extras) 제 코드 같은 경우에는 버튼 클릭 시에 내비게이션의 다음 프래그먼트로 argument도 보내기 때문에 action에 인자가 들어 있는데,
인자 없이 다음 프래그먼트로 액션만 선언해줘도 됩니다. Second Fragment
sharedElementEnterTransition = TransitionInflater.from(context).inflateTransition(R.transition.change_bounds) 다음 프래그먼트에서는 FragmentNavigatiorExtras가 알아서 요소를 공유해주기 때문에 위의 코드만 작성하면 됩니다. inflateTransition로 애니메이션을 줄 수 있는데 아래와 같이 5개의 요소가 있습니다.

만드는 방법은 res -> transition 폴더 생성
change_bounds.xml
<?xml version="1.0" encoding="utf-8"?>
<transitionSet>
    <changeBounds/>
</transitionSet> 이후에 inflateTransition에 적용해 사용하면 되겠습니다.
Reference
Fragment Transitions with Shared Elements using Android Navigation


